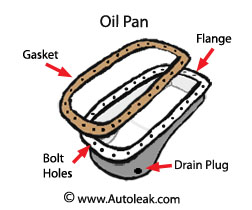
Oil Pan Gasket

Oil Pan Gasket Leaking
Oil Pan Gasket is sandwiched between the Oil Pan and the bottom of the Engine.

When the Oil Pan Gasket leaks, it allows oil to escape down the side of the Oil Pan. This is usually a sign that it is time to replace the Oil Pan Gasket. Oil leaking down the outside of the Oil Pan will show up as a glossy dark trail.

Before Change Oil Pan Gasket(read all instructions before starting)
Due to the design of some cars and trucks, changing the oil pan gasket can sometimes be hard. Some vehicles even require the removal of the engine because vehicle parts get in the way preventing the oil pan from being removed. Please check for this before proceeding.
You will need to have:
Oil Pan Gasket Removal
1 - On Level Ground - Raise part of car with engine (front or back) securely on ramps or jack stands. Block/chock wheels that are not raised so that they will not move. Make sure emergency brake is on, car is in gear and engine off. Make sure car will NOT roll on top of you while underneath it.
A problem that may be encountered is difficulty accessing all bolts in the Oil Pan Flange. Check that you can access all bolts before starting the removal process otherwise you may need a shop or a special tool to do the work for you.
2 - Drain oil out of the Oil Pan into a container via the Drain Plug. This oil should be disposed of as per the regulations for where you live.
3 - Once oil has finished draining, remove bolts around flange of Oil Pan. Keep track of which bolt hole a bolt came out of as sometimes they can be different lengths. These bolts will need to go back in the same hole they came out of if they are different lengths. You can use a piece of cardboard with holes the same size as the bolts to track the positions. Place the bolts in the holes of the cardboard as you remove them.
4 - As you get to the last few bolts in the Oil Pan Flange you will need to support the Oil Pan so that it does not put to much weight on the last bolts. If you do not do this, you may damage the bolts.
5 - Once all the bolts are removed then the Oil Pan should drop away from the engine. Sometimes it needs a gentle tap. Other times part of the Oil Pan Gasket may stay attached to both the engine and the Oil Pan. Since the gasket is to be replaced it is okay to cut it.
6 - For some cars, the Oil Pan will easily be removed completely from the car. In others cars part of the frame of the car will get in the way and it will not be possible to remove the Oil Pan all the way from the car. In either case the old Oil Pan Gasket will need to be cleaned/scraped off of the Oil Pan and the Engine. It is just harder to clean when the Oil Pan cannot be completely removed.
7- Make sure when cleaning off the old Oil Pan Gasket to remove any bits that get into the Oil Pan or inside the engine as you clean.
8 - Clean the inside of the Oil Pan with a clean rag. You may also see the Oil Pan magnet and this should be cleaned as well. All rags should be disposed of as per the regulations for where you live. It should be noted that Oily Rags can catch fire and should be stored in a flameproof container with a lid until disposal.
Oil Pan Gasket Replacement
This is the opposite of removal with the following points:
1 - Line the shape of the Oil Pan Gasket up with the shape of the Oil Pan.
2 - A few little drops of High Temp Silicone on the outside edge of the Gasket can be used to keep it in place on the Oil Pan while moving the Oil Pan into location.
3 - Before tightening any Oil Pan bolt, make sure that all bolts are going through the Oil Pan Gasket into the Engine. Quite often the Gasket can shift as the Oil Pan is put in place and is no longer where it needs to be.
4 - After bolts are lightly tightened then do the final part evenly a little bit at a time rather than one bolt fully to avoid warping the Oil Pan.
5 - Make sure Oil Pan bolts of different lengths are going back in the right Engine Bolt Hole.
6 - Refill the engine with the correct amount of oil before starting. Make sure to have put the Drain Plug back in the oil pan before adding the oil.
Question or Solution not mentioned?
Use
Auto Repair Forum to ask or answer questions about car and auto repair.
Advertise your Auto/Car/Truck Repair Parts or Auto/Car/Truck Repair Business on this site.
Contact us at Advertising@AutoLeak.com
We have affordable advert solutions!
Act now to potentially reach thousands of unique people a month who are trying to repair/maintain their vehicles.